|
These instructions will show you
how to use HandyCards on your PalmOS device to study the files
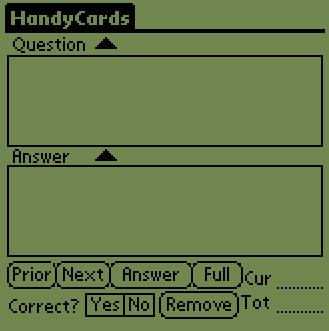
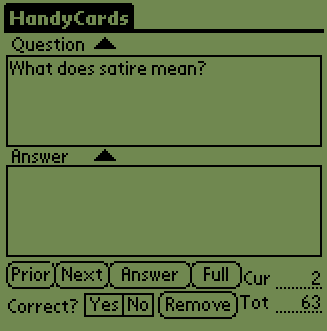
you've placed there. Once you have opened HandyCards, you will see the interface shown in Figure 1.
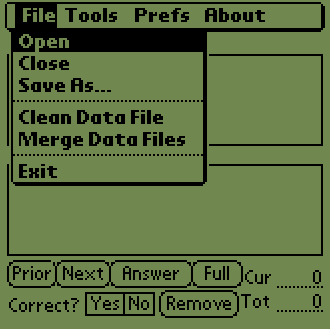
Figure 1 To begin studying, open a flashcard database file by clicking on the "File" menu and then selecting the "Open" option, as shown in Figure 2.
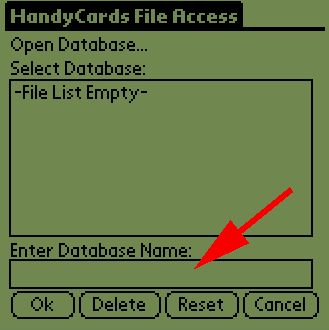
Figure 2 After selecting "Open", you will see the File Access screen, as shown in Figure 3. Because this is the first time using HandyCards, there will be no files listed in the File Access window. To learn more about why there are no files listed the first time you use a file, please see the tutorial with deals with converting flashcards between PalmOS and text formats, which is here. To begin, we will open a file called "funquiz1c" by typing the name in the database name box indicated by the red arrow in Figure 3.
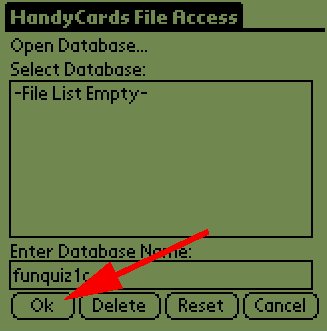
Figure 3 After entering the flashcard file name, open the file by pressing the "Ok" button indicated by the red arrow in Figure 4.
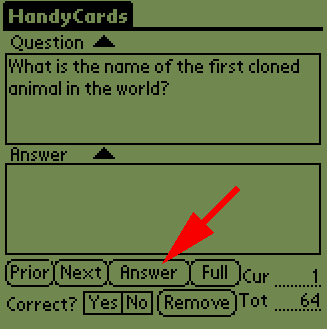
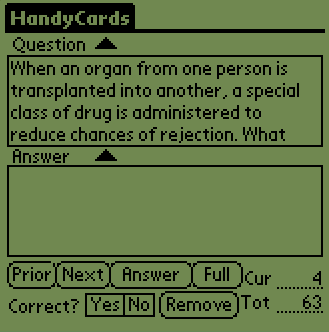
Figure 4 Once you have opened the flashcard file, the first flashcard will be selected at random and loaded into HandCards, as shown in Figure 5. You will see the question is loaded into the upper text box labeled "Question" and the lower text box, labeled "Answer" is left blank. After you have figured out the answer, press the Answer button indicated by the red arrow in Figure 5 to display the answer.
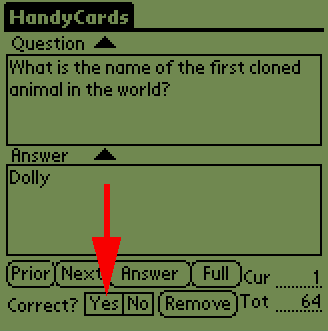
Figure 5 After you have pressed the "Answer" button, the answer will be displayed in the "Answer" text box, as shown in Figure 6. To keep track of your progress, you will need to press either the "Yes" or the "No" button and then press the "Next" button to record whether or not you got the answer right. In this example, we will assume you got the answer correct and press the "Yes" button, as indicated by the red arrow in Figure 6.
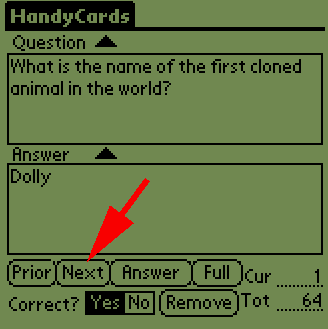
Figure 6 After pressing the "Yes" button, you will see that it remains dark until you go to a different flashcard, shown in Figure 7. Press the "Next" button to advance to the next flashcard, as indicated by the red arrow in Figure 7.
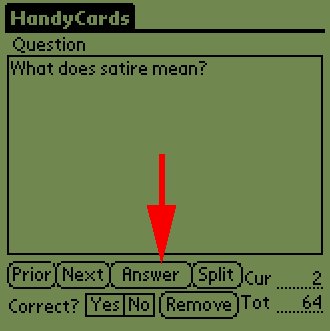
Figure 7 After pressing the "Next" button, you advance to the second question, as shown by the "2" following "Cur", which is short for "Current Question" in the lower right corner of Figure 8. In this portion of the tutorial, you will learn how to change the layout of the testing screen. The default screen is the split set-up where you can see both the question and the answer. However, some questions may be too long to be displayed in the available space. In that case, you can switch to a layout where only one text box takes up al most all of the available screen by pressing the "Full" button, as indicated by the red arrow in Figure 8.
Figure 8 After pressing the "Full" button, the screen layout changes to a full-screen text box, as shown in Figure 9. You will also notice the "Full" button has now been renamed to "Split". This name change indicates that pressing the "Split" button will cause the screen layout to revert to showing both the question and the answer on the screen simultaneously. We will leave the screen layout in full-screen mode so that you can see how questions are answered. To display the answer, simply press the "Answer" button, as indicated by the red arrow in Figure 9.
Figure 9 In Figure 10, you will see that the screen now shows the answer. Please notice how the title for the text box has changed in Figure 9 from "Question" to "Answer" in Figure 10. Next, to finish learning about scoring your testing sessions, let's assume you got question #2 wrong. Consequently, press the "No" button, as indicated by the red arrow in Figure 10, to indicate you did not get the question correct.
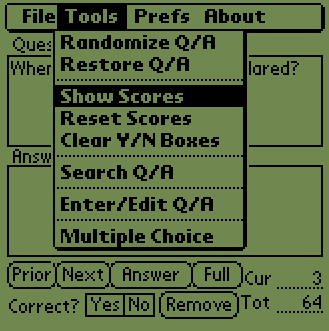
Figure 10 After pressing the "Next" button to complete the scoring of question #2, you will see the third question. Before addressing the third question, it is time to learn how to see your current score. To display your score, open the "Tools" menu and select the "Show Scores" option, as shown in Figure 11. Before proceeding, please notice the "Reset Scores" and "Clear Y/N Boxes" options in the "Tools" menu. "Reset Scores" simply erases any scoring you have done and sets you completely back to zero right and zero wrong. "Clear Y/N Boxes" allows you to reset the "Yes" and "No" buttons at the bottom of the screen in case you accidentally scored a question you didn't want to score.
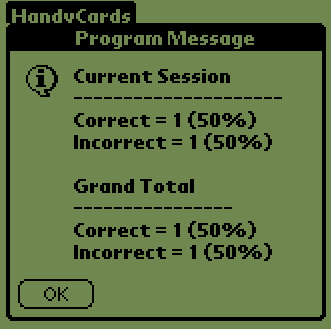
Figure 11 Returning to the task of showing you your current score, the scoring window is displayed after selecting the "Show Scores" menu option, as shown in Figure 12. Your "Current Session" scores indicate your scores for your current pass through your current flashcard file. Your "Grand Total" scores indicate your scores on multiple passes through the flashcard set which is currently being used.
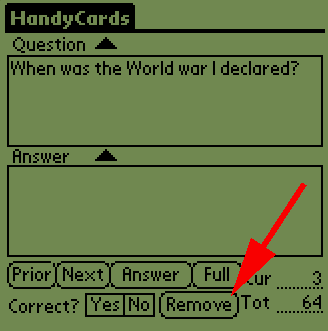
Figure 12 After closing the scoring window by pressing the "Ok" button, you will see the next question, as shown in Figure 13. In this section of the tutorial, you will learn how to temporarily remove flashcards. Temporarily removing flashcards allows you to focus on those flashcards which need more attention. To remove a flashcard, ensure the flashcard you want removed is the active flashcard by making sure you see the question in the current question box and then press the "Remove" button.
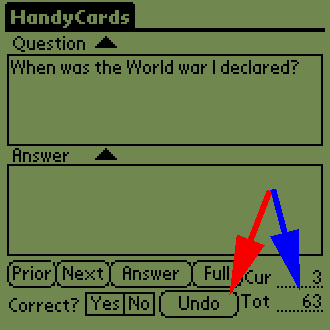
Figure 13 Even though you have pressed the "Remove" flashcard button, the flashcard remains on the screen. This allows you to change your mind and restore the flashcard to the current testing session. Two things have changed on the screen. First, the "Remove" button has been renamed to "Undo" (red arrow; Figure 14), which indicates that pressing the "Undo" button will restore the recently-removed question. The other thing to notice is that the total number of flashcards, as indicated by the blue arrow in Figure 14, has decreased from 64 to 63 after removing the third flashcard.
Figure 14 To confirm that the flashcard has been temporarily removed, press the "Prior" button to go to the preceding flashcard. As indicated in Figure 15, you will notice this flashcard is flashcard #2 of 63. Next, press the "Next" button to advance to the next flashcard. If no changes had been made, the next flashcard would be #3.
Figure 15 However, as shown in Figure 16, you will notice the next flashcard after #2 is actually #4, because flashcard #3 has been removed. Also notice that, at this point, you no longer have the ability to specifically undo the removal of flashcard #3. Should you want to restore all flashcards that have been removed, simply open the "Tools" menu and select the "Restore Q/A" option shown in Figure 11.
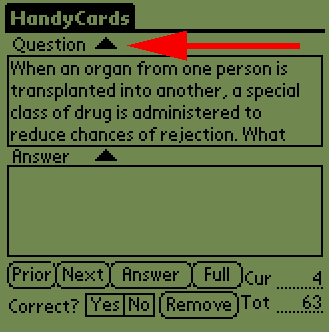
Figure 16 The final feature you will learn of in this tutorial is how to display more text when using the split-screen testing layout. As shown in Figure 17, not all text will be visible in split-screen testing layout. Consequently, you can press the "Expand Text" up-arrow, as indicated by the red arrow in Figure 17. Please notice that there is one "Expand Text" arrow for the question and another for the answer.
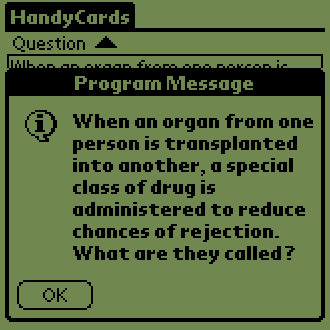
Figure 17 After pressing the "Expand Text" button for the question, you will see a larger message box which can display more of the question's, or answer's, text, as shown in Figure 18. Simply close the window by pressing the "Ok" button.
Figure 18 After finishing a pass through the deck of flashcards, you can repeat the deck by selecting the "Randomize Q/A" option in the "Tools" menu to shuffle the deck and restart testing. If you have removed questions, they will not be replaced. As mentioned earlier, this allows you to focus on those questions which you feel need more attention. Should you want to restore the flashcard to its original content by replacing those flashcards which were removed, select the "Restore Q/A" option in the "Tools" menu. This concludes the tutorial on using HandyCards/Palm
for testing. Should you have other questions, either read the
HandyCards/Palm Readme.txt
or e-mail Support
with questions
you may have.
|